

The Cine Collection M2 Set will help create the ultimate films with our
advanced cinema style color grade 3D LUTs specifically designed for the
Dji Mavic 2 Pro.
In this full set includes our precision filmic Dji Mavic 2 Pro LUTs,
image enhancement, corrective tools, and noise reduction profiles that
will make
your footage look amazing with just a few clicks. This set, unlike most LUTs on the market is designed specifically,
tested and accurately
configured for the Dji MAVIC 2 Pro camera sensor and image
output. Simply put, our LUTs sets work as intended for enhancing your
MAVIC 2 Pro's footage to a professional level. No more fussing over trying to get other LUTs to work with your footage
and rather focus on being creative.
Compatible Software

Apple Mac OSX & Microsoft Windows
EDIUS X Pro | Adobe Premiere Pro CC | After Effects CS5+ | Final Cut X 10.4+ | DaVinci Resolve | Nuke | Adobe Photoshop CC | Sony Vegas | Wondershare Filmora
| Avid Media Composer | Assimilate Scratch | Edius | CyberLink ColorDirector
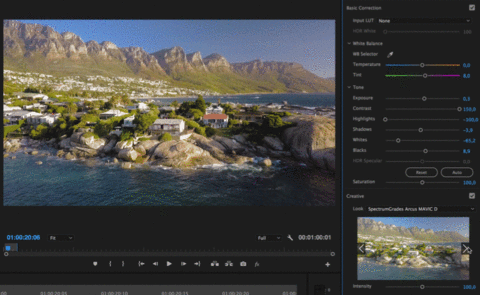
Cine Collection DJI Mavic 2 Pro LUTs & Tools Pack Spectrum Grades
| homepage
How to Install preset LUTs Mac: Add LUTs to Premiere Pro Dropdown Menu
1. Open a new Finder Window
and go to Applications. Open the Adobe Premiere Pro CC folder.
2. Hold Command and click on Adobe Premiere CC. Select Show Package Contents, then open Contents.
3. Open the Lumetri folder. Open the LUTs folder, then open the Creative and Technical folder
4. Drag and drop
the LUTs .CUBE files into the CREATIVE and Technical
folder.

5. Restart
Adobe Premiere Pro CC.
6. In the Color
panel, go to Creative(prefered) or Basic Correction, select the Input LUT
dropdown menu, and the LUTs will be available.
PC: Add LUTs to Premiere Pro’s Dropdown Menu

Custom Style Setting
In the style settings please adjust as follows:
Dji Mavic 2 Pro / Zoom
D-LOG M
Sharpness: 0 or +1 (Recommended, if familiar with noise removal)Contrast: -3 Saturation: 0
Manual Settings Guidelines We recommend filming in manual mode. The idea is to try film at the lowest iso possible to prevent digital noise/grain.Keep iso in the range of 100-400 to manage a clean picture, as natural light gets darker, then iso will have to go up.Shutter speed should be kept in the region of 50-100. If the image is too bright at iso 100 then the better trade off would be to increase the shutter speed to correct exposure levels

For More Download Visit Here Everyday to Download New


![Revo Uninstaller Pro 5.5.2 Free Download Full Version [Latest 2026]](https://blogger.googleusercontent.com/img/b/R29vZ2xl/AVvXsEjleV0uhnpoQw0QqCDhmmlNrWg-ax0bj3s-PHMpm9TzwRUMGeKSMGUVDdyOqlxIYpy4-aQdW84zJWZZt9yCu5qK636hJjVuglEdsYa9wpo6pp4uYkwgYICKoTMyMjeROgjjyGkE406xH8hn8cczbvRu2PPojWk6_UuS6jy8WDgNbj8HLbAkMmxLrsKMJ-fG/w74-h74-p-k-no-nu/Revo%20Uninstaller%20Pro%205.5.2.png)

